I use affiliate links on my blog. When you click on my links, I may make a commission. Thank you!
I’m new to this adventure of feeding sourdough starter, making sourdough bread and everything in between. I’ve had quiet a few flops. Didn’t rise, undercooked, over-proofed. I’m in a few sourdough bread Facebook groups. I’m definitely learning (and asking question after question). Not sure who is in the same boat so I thought I’d put some sourdough terminology and definitions here, to help out other newbies.

If you are a seasoned sourdough bread maker, please comment! Help me add to this list and let it grow.
Sourdough Bread Terminology and Definitions:
Sourdough Starter: This is your baby! You’ll need to take care of it and feed it! You can make your own (and wait a few weeks to bake), buy it dehydrated from bread companies or post it in a local group. I did and found three people that offered me some for free. Most people keep it in a wide-mouth jar (Ball or Mason jars work). Find a simple recipe to start and take care of your starter. If you don’t bake daily you will need to either dump and feed your starter or keep it in the refridgerator. If you get mold in it you will most likely have to dump the whole thing.
Discard: This is the starter that you let rise and fall and are removing from the jar. If it is fresh, you can bake your sourdough with it. If it is older (24 hours+) then you can still bake with it but the bread will not rise the same. Search up discard recipes. I have not tried it yet, but I’ve seen some recipes with discard for crackers, focaccia, pizza dough and brioche.
Inclusions: These are the fun extras you are going to add to your bread. It is to be done after bulk ferment, not before. Gluten strands are too weak to be able to stretch the dough without it tearing. I’ve seen so many. Rosemary and oregano, jalapeno and cheddar, chocolate chips and walnuts (weird to think of sourdough and adding something sweet, but it is still good).

Feed (feeding your starter): I have seen a TON of different rations. I use 1 cup flour and 1 cup water and mix it with my starter.
Lamination: in lean sourdough happens before bulk rise. It’s a process of pulling the dough as thin as possible in all directions into a large thin sheet and then folding the dough over itself a bunch of times. It helps create layers of dough that are strong enough to trap CO2 and support the gluten structure. It can be another method of building strength. It’s also a way to incorporate inclusions evenly throughout your dough.
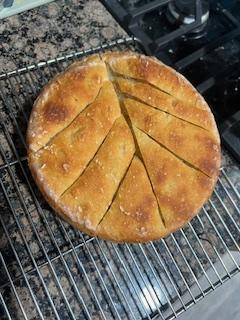
Discard and feed: If you don’t bake, you’ll need to discard some of your starter. Some people use it in ‘discard recipes’ and others will toss it. Do Not dump it down your sink! It’ll clog your pipes. If you use discard that is too old, it won’t rise and will be flat (like my flop in the picture below).

Rise: You can feed your starter and wait for it to rise before using it to make dough. Or you can use this word as a way to wait for your dough to rise for you to start baking.
Bulk ferment: This is the time you are letting your bread sit and rise. Keep it in a bowl or batton, put a tea towel over it and keep it in a warm place, away from drafts. I keep mine in the microwave. If a bit of time has passed and nothing is happening, I’ll leave the microwave door open for a little bit. That TINY bit of heat from the lightbulb inside the microwave helps the dough rise. During bulk fermentation, the gluten network keeps developing, and yeast fermentation happens too, producing gas that inflates the dough from the inside. This internal pressure supports the dough’s structure….puffing it up!!!
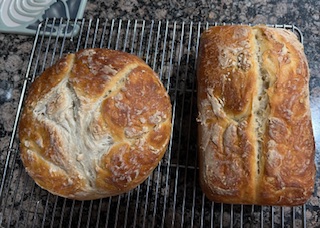
Boule: Your gorgeous baked round ball of bread!
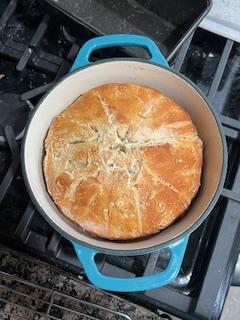
Douch Oven: I only one one of these, so if I’m making more than one loaf I’ll use a Pyrex round dish or a rectangular metal bread pan. But these work great and can be used for other cooking in the stove or on the stovetop. Right now, as of two days ago, Costco had a sale on two for about $50. I bought mine on Amazon a few months ago and am happy with it. It is 3.5 quart and sale for $31 right now.
Stretch and fold: A way of kneading the dough. It is what it sounds like. A great way to strengthen the dough and activate the yeast too.
This is not my group, but I have found it very helpful. Sourdough Bread for Beginners. I found a few others too, Sourdough Geeks, etc. There are a LOT. But the more experienced groups might not have the same patience if you have a lot of questions.
Things you don’t need right away, but might want:
A sharp bread knife. This made a huge difference in being able to slice my bread for sandwich bread.
A bread lame. This is used to score the bread. Some people just get an Exacto knife or use a knife like the one above. It all depends on how much you want to decorate the top of your bread.
Banneton: A soft basket to let your bread rise in. I have not tried one yet.
Dutch Oven: A ceramic pot with a lid that is versatile and can go on the stove top (soup) or you can bake your bread in it.
Other recipes I’ve seen with sourdough starter: Apple Fritter Donuts, Cinnamon Rolls, Bagels.
I’ve started to add inclusions, trying to bulk ferment (so I have sour-er sourdough bread) and have even given starter to a few friends. I want to learn to score better and make the bread look pretty and I want to learn to make smaller ones (for something like individual size bread bowls). I’m sure I have a lot to learn and will still make more mistakes but I’m having a lot of fun while learning.
Some recipe ideas I haven’t tried but found online:
Brown sugar cinnamon raisin
Chocolate chips and walnuts
S’mores
White chocolate and almonds
Blueberry lemon
Chocolate chip espresso
Here is a basic recipe I use. I DO think it is important to use a scale. Weight is more accurate than a measuring cup. But, again, I’m still new. I’m going back and forth between both. I’m also getting to the point where I’m eyeballing the recipe, rather than 100% accurate measurements. Today I substituted coffee for water and the dough is currently rising. I’m going to add some chocolate chips before baking too.
Sourdough Bread Terminology
This is a ‘no knead’ bread recipe and it stays fresh for several days. It is also easy to double.
Ingredients
- 1 cop sourdough starter
- 2 tsp. Salt
- 1 Tbs sugar
- 1 ⅔ cups water at room temperature
- 3 ⅓ cups flour (leave the flour out, you might need a tad more).
- Butter (to grease inside of pan)
Instructions
In a large mixing bowl, combine the sourdough starter, salt and sugar. Then add your water and flour. Mix well. It should pull away from the sides of the bowl fairly easy and clean. If it is too sticky, add more flour. If it is too dry, add more water. Only add a tiny bit at a time.
Cover the bowl with a tea towel. Leave it in a warm place for at least three hours. You’ll know when it is done when the dough is puffy and swollen. It should have risen some, but doesn’t need to be a huge difference.
When it is finished rushing, punch the dough down then use two forks to scrape the edges of the dough away from the sides of the bowl and fold it in, towards the center, until you have essentially turned the whole thing in on itself.
Grease the inside of the dutch oven with butter. Lift your dough into it. Shape it a little if necessary.
Cover again with a towel and put back in a warm place. Let it rise at least another hour.
Preheat oven to 425 degrees F. Cut a fairly deep slit along the top of the loaf (this is called scoring and it prevents the bread from splitting in a random place).
Put the lid on bread and bake for 15 minutes.
Lower temperature to 375 degrees F, remove the lid and bake for another 20-30 minutes (my oven needs 35). You’ll know it is down when it is nice and brown on top. If you knock on the top of the bread it’ll make a hollow sound.
Remove the bread from the oven when it is finished. Remove from the dutch oven and place on a cooling rack. Let it rest for at least 10 minutes. It is still cooking as it cools off. Unless I want to eat mine immediately, I let mine cool for ½ hour.
Store once it has completely cooled off (I put mine in the microwave if I’m not going to be home- I place the dough there to rise too, if the house is too cold). For longer storage, I put it in a 1-gallon Ziploc bag.This is a ‘no knead’ bread recipe and it stays fresh for several days. It is also easy to double.
Notes
I've doubled this recipe but have not tried anything more. It is messy and hard to mix.
Other yummy recipes from my blog.
Please add more vocabulary and tips in the comments and I’ll edit the post as they come in!

Leave a Reply